Tag Archives: gluten free

Banana Pup Cups | Let’s Celebrate!

1 Jun

ollieskate

Ollie turns five tomorrow and that’s cause to celebrate! He’s our favorite little clown, who loves to sing, still suckles his “Precious” fleece toy, bounces like a little jumping bean when he sees his favorite humans, and he always has time for a good bum scratch!

We adopted him when he was just 13 weeks old, a puppy mill rescue with a special back foot. He has been a great side kick for Stevie and keeps us all laughing!

In honor of his birthday I created a frozen dog treat recipe, which was really easy to make and only has four all-natural ingredients!

bananapupcups

Banana Pup Cakes
makes 7 frozen treats

Ingredients

2 – ripe bananas
1 – 4 oz container of unsweetened applesauce 
1/2 cup of buttermilk
1/4 tsp cinnamon

Steps

1. Mash ripe bananas in a medium size bowl with a fork.

2. Add remaining ingredients and combine using a spatula.

3. Place cupcake liners in a muffin pan.

4. Spoon the batter into the muffin pan, filling cups a generous half full. (I got 7 frosty treats out of my batter.)

5. Place in the freezer, our treats were frozen solid in 2 hours.

Notes

  • These treats are great for pups with allergies, Stevie is intolerant to all things poultry, they are vegetarian, wheat, and soy free.
  • If you have difficulty removing the frozen treats from the muffin pan, just flip the pan over and run warm water on it for a few seconds.
  • The cupcakes wrappers are easy to remove and just peel off, no need for non-stick spray.
  • If you are running out of room in your freezer, 6 of these treats fit in a loaf pan, and would save space.

Stevie & Ollie approved!

Advertisement

Happy New Year | A Healthy Start!

19 Jan

photo-7

Holy cow! Happy 2014! Where did all of the days after Thanksgiving 2013 go? Wheeee!

After lots of yummy, and well worth it in a homemade-coconut-cream-pie-kind-of-way, holiday eating & baking & giving, we’re back on a healthier eating track. A friend recommended a healthier food blog to Jess and we’ve started flipping through all of the wonderful cookbooks (old & new) on our bookshelves for inspiration–with the interwebs a finger’s length away, it’s easy to rely solely on them web for meal planning even though we’ve got a wealth of beautifully bound print books close by. One resolution (use what we’ve got!) is well underway.

Here are the two things we’ve (ahem…Jess) has made so far from Sarah Britton’s blog, My New Roots. The Winter Abundance Bowl (recipe here) and these little gems (Spaghetti Squash Baby Cakes with Crispy Sage). The abundance bowl was insanely good (seriously, it’s a MUST make)–trust the recipe and her cooking process AND the fact that everything tastes amazing together (a bite of this with a bite of that) with all of the the different textures. Oh hi, pumpkin seed sauce! Where have you been all my life? It would be a delicious dip for veggies, too.

We adapted the squash baby cakes recipe because every store we went visited was out of spaghetti squash (seriously, not a single one). Jess used butternut squash instead and didn’t include the fried sage leaves on top & they were still delicious and sage-y. She cooked some of the cakes in a skillet and then baked the rest. The leftover cakes heated up really well in the toaster oven. I don’t love butternut squash and I happily ate these up.

I’m really excited to explore the other recipes on My New Roots and share our experience with you.

We had what seemed like a million carrots in the refrigerator so I made a really yummy Ginger Apple Carrot Soup from Joy the Baker’s blog one Sunday afternoon. 

Ok. It wouldn’t be a good food related post without ending on a yummy sweet treat that I’ve made several times since discovering the recipe. Available here (but I’ve shared the recipe below so I can include my tips/process notes). It makes four servings and even though you’ll be tempted to eat more…don’t do it–it’s really rich.

photo-6

Chocolate Ricotta Mousse from Real Simple
Serves 4

Ingredients

1 15-ounce container ricotta (about 2 cups)
2 tablespoons confectioners’ sugar
1/2 cup semi sweet chocolate, melted, plus more, shaved, for topping (I used these mini chocolate chips and then just sprinkled a few on top)

Directions

  1. In a food processor, blend the ricotta and sugar until smooth.
  2. Add the melted chocolate and blend until thoroughly mixed in (should be a smooth chocolate color with no visible white).
  3. Divide among bowls and top with the shaved chocolate.
  4. The mousse can be refrigerated until ready to serve, up to 2 days. The original recipe says to bring it up to room temperature before serving — but we like it a little more chilled so I usually toss in into the refrigerator after making it for 30 minutes or so.

Maker’s notes:
There were several comments on the original recipe that said it had a very grainy texture. Mine wasn’t at all–quite the opposite actually. I attribute this to 2 things.

  1. A great (but not insanely expensive) food processor. We have this Cuisinart that I found online on sale for $99. I don’t care that it’s white and doesn’t look super modern & sleek. It’s an amazing kitchen work horse.
  2. Really good quality whole milk ricotta (I know I’ve mentioned it before, but Calabro is my favorite & we buy it at Whole Foods). It’s creamy &  blends up very nicely. It’s so tasty, that I’ve been known to eat it straight from the carton with a little bit of salt & pepper. Oops!

What healthy and delicious recipes have you been making in 2014?

Simple Side Dish | Sriracha Honey Glazed Carrots

6 Dec

carrots

Since my Sriracha roasted brussels sprouts post was so popular, here is another really simple side dish recipe. How simple you ask? You are just three ingredients closer to tasty town. Y-E-S!

Sriracha Honey Glazed Carrots
serves 2

Ingredients

 1 lb organic whole carrots (cleaned, peeled and cut into circles)

1 TBS cold pressed olive oil

1 TBS Sriracha (hot chili garlic sauce) 

1 TBS local raw honey

salt and pepper to taste

Steps
1. Preheat oven to 400 degrees

2. Lightly coat a baking sheet with nonstick spray or olive oil
3. Place the prepped carrots in a medium bowl
4. Combine olive oil and Sriracha, pour over carrots, stir to combine, make sure they are coated evenly.
5. Place coated carrots on to the prepared baking sheet in a single layer.
6. Season with salt and freshly ground pepper.
7. Bake 20 – 30 minutes depending on the roast level you desire. Stir carrots half way through to ensure even browning.
8. Remove from oven, while the carrots are still hot place in a bowl and coat with the raw honey.

Notes
1. Sriracha is a sweet hot chili garlic sauce, 1 TBS will give you a slight heat factor, feel free to increase the Sriracha in this recipe to increase the heat!
2. Serve each portion in a vintage bowl. The bowl in the picture is not vintage, but it is cute and made by Marimekko.

Makin’ Pies | A Thanksgiving Recap

4 Dec

“It’s not far I can walk down the block to Table Talk
Close my eyes make the pies all day
Plastic cap on my hair I used to mind now I don’t care
I used to mind now I don’t care ’cause I’m great” – Patty Griffin

Me and my grandparents circa 1982. I think.

Me and my grandparents circa 1982. I think.

When I was little my grandfather used to tell me this story of one of the first jobs he had as a kid. He would go into local stores and look for mold on all of the Table Talk pies that they were selling. His job was to take a little pocket knife and scrape the mold off of the bottom crust and place the pie back on the shelf. It was the depression and totally indicative of the times and the spirit of that era.

Why all this talk about pies and making pies.. well I made several different versions of pumpkin pies for Thanksgiving and wanted to share some recipes, links and love. Kate thinks I am crazy, and often calls me a baking renegade. Thanksgiving week was no different. I decided to make four pies this year, one to keep and the rest to give away. They were all pumpkin based, one traditional, a vegan option, and even a gluten-free paleo friendly option! Now you get the picture. For real.

twopies

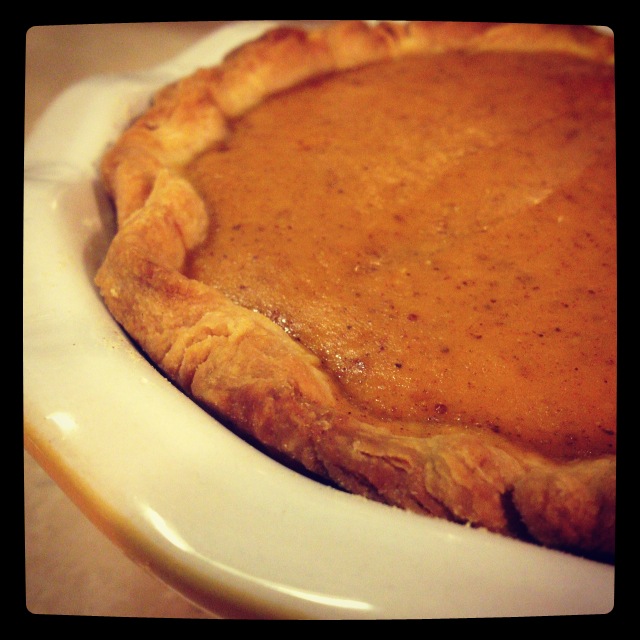
The traditional pumpkin pies were for my family and for the staff that volunteered to work Thanksgiving morning at Bloc, one of the cafes I manage. This had a buttermilk and butter crust and Kate’s Dad’s pumpkin pie filling recipe. The results… amazing! The crust was evenly browned and crisp and never got soggy even after chilling in the fridge overnight!

The crust recipe is from Joy the Baker’s blog and it is her Dad’s Perfect Pie Crust recipe.
Here’s the link: Dad’s Sweet Potato Pie

I don’t want to share Denny’s exact pumpkin pie filling recipe here, so I have found a similar vintage pumpkin pie recipe that will do the trick.
Carnation’s Famous Pumpkin Pie from 1959 (hint: leave out the cloves in the recipe)
Notes:
– I made the crust in the food processor and it still came out amazing
– I didn’t have buttermilk on hand, so I made my own with 1/3 c whole milk and 1/3 tsp cider vinegar
– I had extra pie crust & filling since I used recyclable pie tins for my lucky pie recipients, so I made a mini pie for Kate & I 🙂

extrafilling

Next up…Vegan Mini Pies, delivered swiftly to the folks that volunteered to work at Diesel on Thanksgiving morning! The crust is made from coconut oil, not shortening and is soy free. It remained very light in color, but yielded a very sturdy, yet flaky crust. I found this recipe on a blog that is amazing and super cute, Loves and Lemons, it was the complete recipe, the author provided.

Again, I made the crust in the food processor, no kneading or hand cutting in the fat for me! The only change I made was that I used canned coconut milk instead of almond milk in the filling, because it is what I had on hand.
Mini Vegan Pumpkin Pies

veganmini

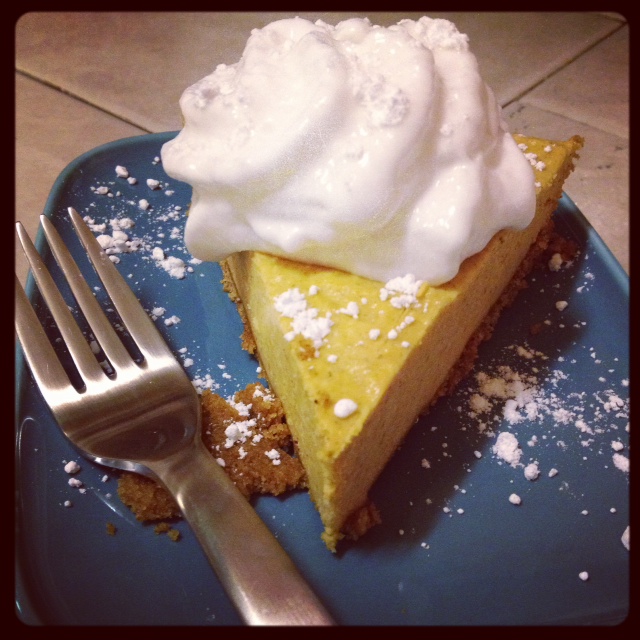
Lastly, a recipe I had been wanting to try out since the first Fall leaf hit the pavement. Paleo Pumpkin Cashew Cheesecake from Paleo Fondue. One word Y-U-M! Kate isn’t even a fan of cheesecake and she loved this recipe. In typical Jess fashion I did make a substitution. I thought the unsweetened coconut crust that she used in her recipe was too “healthy” for my liking at the time, so I made my own crust recipe up:

Gluten Free Ginger Snap Crust
makes enough for a 9″ spring form pan

3/4  package of Mi-Del Gluten Free Ginger Snaps
1 TBS melted virgin coconut oil
pinch of all natural sea salt

1) Pulse ginger snaps and salt in a food processor until evenly sized crumbs are created, graham cracker cust

2) Once ginger snaps are processed, add the coconut oil and pulse until crumbs look evenly coated with oil and wet

3) Coat the bottom of your spring form pan with the crumbs and evenly press the layer, ensuring that the mixture goes about 1 inch up the sides of the pan

4) Place pan on a baking sheet and bake crust in a 350 degree oven for 8-10 mins, check frequently you don’t want your crust to burn. You are just baking the crust enough to set it.

5) Cool crust completely then refrigerate while you make the cheesecake filling.

pumpcheesecake

Notes:
– In the photo above I made coconut whipped cream, using chilled canned full fat coconut milk and powdered sugar.

There you have it, our Thanksgiving recapped in pie recipes. You should try all of them, but if that is too overwhelming, just take my advice and bake at least one of the recipes above. It will be worth it.


Making Breakfast Easy | Pumpkin Spice Oatmeal

23 Nov

Clearly I’m obsessed with pumpkin. I’ve fallen head over heels for the flavors of Fall. Last night my friend Dillan (Instagram handle: dillandigi) posted a photo of an overnight pumpkin oatmeal he was prepping for the morning. This was the inspiration for the recipe that I’m posting here today.

A few weeks ago, when Kate was traveling in Texas for work, I made myself pumpkin oatmeal in the slow cooker. It had good flavor, but it made a ton and the edges got kind of well done. So last night, I was looking online for overnight refrigerated oatmeal recipes, but decided that I might not like the texture, or that they might not be to my liking once heated up (since I didn’t want cold oatmeal this morning). Of course, typical me, I decided to wing a pumpkin oatmeal recipe this morning, inspired by this Choco-Banana-Chia Oatmeal recipe that Dillan posted on his blog in September (it’s especially tasty)!

pumpkinoats

Pumpkin Spice Oatmeal

makes 1 serving

Ingredients

1/2 c Trader Joe’s Gluten Free Rolled Oats
1 c boiling water
1 TBS 100% pure pumpkin puree (not pumpkin pie mix)
1/2 TBS chia seeds
1 tsp organic virgin coconut oil
2 tsp pure maple syrup
1/4 tsp pumpkin pie spice
1 pinch all natural sea salt (fine)
1 TBS organic dried cranberries

1) Add boiling water to the oatmeal and stir. I like my oatmeal a little on the thicker side, so I also microwave the oats and boiling water for 25 seconds, then stir.

2) Add pumpkin, chia seeds, coconut oil, pumpkin pie spice and stir.

3) Top with maple syrup, a pinch of salt and dried cranberries.

4) Enjoy!

Notes:
– Be sure to keep a close eye on your oatmeal in the microwave, if left unsupervised it can overflow & leave a mess.
– If you like your oatmeal unsweetened, omit the maple syrup–or for a less sweet option, reduce the syrup to 1 tsp.
– Feel free to use oats that are not gluten-free, the recipe would work just as well.
– Other delicious toppings would include: sprouted almonds, toasted pecans, or whipped cream.

Another great advantage of this recipe is that it is really healthy and costs almost nothing to make. All of the ingredients included in this recipe were items we had in our pantry–can’t get much better than that! 🙂

All About Fall | Gluten Free Buttermilk Pumpkin Spice Pancakes

19 Oct

My friend Potter, recently went for breakfast a the Neighborhood Restaurant. This is a local family owned breakfast joint located in Union Square, right down the street from Bloc 11 Cafe, where he and I both work. Potter and I share a love for all things pumpkin and he was going on and on about these pumpkin pancakes he had there, my mouth was watering just listening to him….

Bloc 11 courtyard

Bloc 11 Cafe courtyard: Scarecrows need coffee too!

Of course, this lead me to an inner baking challenge, something I set myself up for on the regular,ha! I was determined to come up with delicious gluten free and/or on the healthier side pumpkin pancakes. King Arthur Flour’s gluten free pancake mix was on sale at Shaw’s, so I used this as the base for my pancake recipe. In another effort to ensure a successful gluten free recipe I researched online, but had no luck. I even posted an outcry to my foodie friends on Facebook, which yielded no recipe results… my determination grew.
In true Jess fashion, as Kate would call it.. I just made my own recipe up, ad-libbed and hoped for the best. And as luck would have it, they came out perfectly! Success.

#yum

#yum

Guten Free Buttermilk Pumpkin Spice Pancakes

Makes 8 – 4″ round pancakes

Ingredients

1 1/3 cup King Arthur Flour gluten free pancake mix
1 cup organic or local whole milk (I used High Lawn Farm from Lee, MA)
1 tsp Bragg’s organic and raw cider vinegar
1 large organic egg
3 TBS 100% pure canned pumpkin (not pumpkin pie mix)
1/2 TBS organic virgin coconut oil (melted)
1/2 tsp pumpkin pie spice

1) Measure out the milk and add the cider vinegar to it, making your own buttermilk. Let sit for 3 – 5 minutes.

2) Whisk together the egg, pumpkin, buttermilk mixture, and coconut oil.

3) Whisk in the pancake mix and pumpkin pie spice.

4) Allow the batter to sit for 10 minutes to thicken.

5) Preheat a griddle or large flat grill pan. I used our gas stove and set the burner on 6.

6) Grease pan with a square of organic butter.

7) Scoop the batter by the 1/4 cupful or I used a #16 dough/portion scoop onto the lightly greased pan.

8) Cook for 1 – 2 minutes, until bubbles form on the tops of the pancakes and the bottoms are golden brown.

9) Flip and cook for 1 – 2 minutes on the other side. Serve hot, with organic butter and organic warm pure maple syrup.

These pancakes came out amazing, and you can’t even tell they are gluten free! There is a slight pumpkin undertone with just the right amount of spice to add to the flavor, but not mask the pumpkin. I would make these again in a heartbeat. The recipe made 8 full sized pancakes and a tiny silver dollar sized pancake, the perfect size to split between Stevie and Ollie and they gobbled it right up 🙂

Notes:
– This recipe could be made dairy free by substituting the milk for coconut, soy, or almond milk and replacing the butter with Earth Balance
– A great side, as pictured above is Applegate Farms Organic Sunday Bacon. (I cooked it in the oven on 400 for 15-18 mins on a parchment lined baking sheet*) *Oven baked bacon credit goes to our friends Laurie & Gabe 🙂
– Substitution suggestions for toppings: Maple Cream, Pumpkin Butter, or Baked Spiced Apples.

Cutest Pumpkins Ever!

Cutest Pumpkins Ever!

Happy Fall!

Make My Morning | Easy Dairy Free Baked Oatmeal

13 Jan

baked oatmeal

My first post of 2013, making changes and organization continues… are you sensing a theme from our tiny household? Last Fall I got into making a large baked oatmeal recipe that Kate and I would take pieces of for breakfast to have at work during the week. It was addictive and I made it several times, each time mixing it up a bit and changing the fruit I added to it. I even got Kate’s dad, Denny, into making it and eating it!

Needless to say, after a while I got sick of baked oatmeal every morning, and I stopped making it. That was last year and with the new year, Kate asked me to start making it again in order to get back into healthier habits 🙂 Below is the recipe I created for 2013 and even made dairy free and gluten-free! The best part about this recipe is that it can all be made in one bowl, easy to put together and even easier clean up.

Dairy Free/Gluten-Free Baked Oatmeal

Ingredients
2 eggs
1 c soy milk (I used vanilla that is what we had on hand)
1/3 c maple syrup
1/2 c apple sauce
1 tsp cinnamon
1/3 c walnuts (chopped)
1/3 c shredded coconut
2 c frozen berries (I used blueberries and blackberries)
1/3 c dried cranberries
2 c rolled oats (I used gluten-free rolled oats from Trader Joe’s)
1/2 tsp salt
1 tsp baking powder

Steps
1) Preheat oven to 375 degrees

2) Spray a 9 or 10 inch pie plate with nonstick spray

3) In a large bowl whisk together all of the wet ingredients

4) Add the remaining ingredients to the wet mixture and stir with a wooden spoon or spatula

5) Pour mixture into your prepared pie plate

6) Bake for 40 – 45 minutes until golden brown

Notes:
1) Kate loved this recipe, but I found that it was too dry for my liking.
2) Denny loves his baked oatmeal more moist, he usually adds double the amount of milk to the recipe, I’m sure this would work with this recipe too.
3) Try topping this recipe it with 2 TBS of melted Earth Balance non dairy spread right when you take it out of the oven.
4) Serving suggestions: top with maple syrup, or Chobani Greek yogurt (if you like dairy), or pour some warm soy milk on top.

Happy and healthy 2013!

%d bloggers like this: