Archive | May, 2012

A (long) Weekend in Pictures

29 May

Yippee for long weekends, birthdays, friends, family, cute pups, sweet surprises, more-than-a-day off with Jess, new green thumbs, adorable babies, inspiration, yummy sweets, homemade goodness, truly talented friends, vintage treats & …

…city gardening…

…new boston terrier art…<heart my bro & his wife!>…

…pretty flowers…

…vintage containers…moustaches all around…yummy homemade ginger syrup <how to here>…

…homemade *Sno Balls*…

…pooped <& very clean> pups…

…how’d I get so lucky?

xo

Another Decor DIY | Old is the New New

23 May
We recently got a secret framing tip while visiting our friends at The Little House Studios and since it’s been so long since my last blog post, I feel like I should spill the beans & share it with you.
 
The tip?
Hit up vintage shops & antique & flea markets for old frames for new artwork or photos. I know, it sounds obvious, but I think it’s really easy to overlook old finds for new Ikea frames, simply because one stop shopping is a little more convenient.
 
The search is on...
So via our Little House Studios friends, we heard especially great things about the Cambridge Antique Market. In all honesty, I’ve had great luck finding frames at thrift stores and as I mentioned, there’s nothing wrong with Ikea, but we bought an incredible & intriguingly creepy print by Alethea Roy. And well, it was screaming for something different. I knew I wanted something old. Jess suggested something round or oval (inspired by a vintage mirror that was my gran’s that’s hanging in our office). So off I went to the Cambridge Antique Market with the print & measuring tape in hand. (If you can’t/don’t want to bring the artwork, you could just take measurements & jot them down or trace the shape of your artwork with a piece of tracing, parchment or tissue paper & bring it along instead.)

If you’ve never been to the Cambridge Antique Market, it’s a little overwhelming. I felt like Goldilocks. There were plenty of framed pictures & artwork & some frames without but none were quite right (too $$$, wrong shape, wrong size, missing parts, etc.). I contemplated  skipping the 5th (and final) floor but headed up there anyway. I’m oh-so-glad I didn’t give up hope because I found the perfect frame — the right size, the right price and antique convex glass to boot! It definitely needed some love — the metal branches on the top & bottom of the frame were broken off — but I’m always up for a challenge. Oh, and I paid in cash & received $6 off the asking price, making it a total steal at $26. Woo hoo!

Another tip: Look beyond what’s inside the frame. There’s a lot of bad art & crazy old family photos out there — just hanging out in perfectly good frames!
 
So you’ve got the frame, now what?
When I got home, I took out my wire cutters (part of my jewelry tool arsenal….I secretly hoped I didn’t need something more heavy duty), glass cleaner & paper towels, a dust cloth & newspaper. I disassembled & cleaned the frame & glass and cut & removed the rusty picture wire.  I removed the old Victorian photograph & contemplated saving it but it was warped & had some water damage so I set it aside for possible donation (another man’s trash is…).
 
Refurbishing 
I contemplated what to do about the broken branches & decided to cut them off. I was able to use the wire cutters that I had — the metal was super soft & silvery under the gold. It kinda made me worry/wonder if the branches were made of lead (?). That said, I trimmed them down. I was originally planning on filing them to smooth any sharp snags & make it appear as if they were never on the frame in the first place, but, for safety’s sake, I decided to forego the filing. Because the branches were a different material than the rest of the frame, they were painted in gold (possibly gold leaf?) so after trimming them I wondered what to do about the silver metal shining through.
 
I grabbed a gold Sharpie (one of the oil-based paint variety) from my stash, some black shoe polish & a soft cloth. I dabbed the silver patches with the gold Sharpie, let it dry & then put a little of the shoe polish on the cloth & buffed the freshly coated gold paint. I had no idea if it would actually work, but it did! It perfectly added a little age/patina to the spots I’d touched up & blended them with the rest of the frame. I thought the bumps would drive me nuts but I really don’t mind them. They add “character”.
 
New meets old
With the frame clean & ready, I carefully measured & trimmed the edges of the artwork to fit in the frame. Then I reassembled all of the parts & gave the front of the glass one more wipe down to get rid of pesky fingerprints. And…voila!
 
Share your projects with us!
How have you transformed something old into something new?

Napkin Notes & Lunch Totes | Who Will You Inspire?

12 May

one of my absolute favorite photos of my mom

This is a hard time of year for me when it comes to “all things mom”.

My mom passed away 11 years ago in April and her birthday is in the beginning of May, with Mother’s Day always close in tow. As one might imagine, the passing years don’t necessarily make me miss her any less. There are every day things I want to pick up the phone & share with her and bigger life things I want her to be a part of. I miss her.

My mom was a very special lady & she inspired others. I thought it was appropriate, with Mother’s Day tomorrow, to share that she was the inspiration for the title of this very blog.

So…what the heck is a sippet anyway?

It’s a strange little word that defines a small piece of toast or fried bread typically eaten with soup or gravy.

My mom used to cut buttered toast into little strips and serve them to me and my brother with soup. These little bits of toast hit the spot & washed away sickies, brightened hard days of school, magically healed knee scrapes, etc. For a few minutes, the world disappeared in freshly dunked soup soaked sippets. To this day, these memories are like a warm hug from my mom.

So…what do Sharpies have to do with all of this?

I think all of my fellow artist friends keep at least one Sharpie marker in their arsenal of supplies. They are an essential part of daily life (& not just for artists & taggers!), as demonstrated by Julia Roberts in Pretty Woman when she used a black permanent marker to color a rip in the heel of her boot.

I’ve used them to write on everything from paper to glass…& everything in between.

My mom was creative with her use of Sharpies, too. She once repaired a favorite colorful jungle themed sweater (ah, the 80’s!), that she’d spilled bleach on, using a rainbow of Sharpies. But my favorite thing my mom created with Sharpies were the amazing lunch bags she sent me & my brother to school with every single day of our school days (from kindergarten through high school!). Plain brown paper lunch bags were transformed into a colorful pictures of the day, labeled with our name & homeroom. Seasons & daily weather, school projects & events – you name it — they all provided inspiration for my mom’s lunch bag artwork.

The best things in life…

Just like my mom’s decorated lunch bags, Jess and I believe that the best things in life are the little everyday delightful things – homemade/hand crafted little treats that spread smiles. We started this blog to share those delightful things with you — from our little home & the very bottom of our big hearts, to yours.

So, give your mom an extra hug tomorrow & take time to remember (out-loud!) all of your favorite memories that she shaped. Tell her you love her again & again & again. If your mom is beyond this Earth’s atmosphere, honor a good friend who’s a new mom or tell a mentor/woman who inspires you just how much she’s touched your life.

To all the awesome moms out there — know that you are loved & that all of the packed lunches, baked treats, kisses, band-aids, hugs, home cooked meals, napkin notes, good advice, laughs & handmade goodies are appreciated and will live on forever in the warmest of memories & traditions.

Hug the ones you love!

xo
Maker

Easy Peasy! | Stencil project

9 May

I’m sharing a quick & easy mid-week project because it’s perfect for a last minute Mother’s Day treat (who doesn’t keep some sort of project, to do, grocery, or inspiration list?!). My dad used to keep folded pieces of lined paper in his shirt pocket for on-the-job lists & notes but we’ve recently gotten him jazzed about these little gems (how cool that you can customize them, too?).

So…I wanted to make him my own version to put in his Easter basket. While I couldn’t find a notebook in the exact same size, Moleskine’s Cahier size notebook is close enough (and who doesn’t love Moleskine?!). I prefer the kraft brown but a word of caution: it can be a little tricky to stencil on if you’re using a sticky stencil because you might peel some of the kraft paper up when you lift the stencil. It’s possible, just be careful.

Supplies

Stencil (steps for making your own included below)

  • Pen or extra fine point permanent marker
  • Frisket (wide masking tape or contact paper, etc. – I used transfer paper commonly used with adhesive vinyl because it comes in a large roll & has a printed grid pattern that makes it easy to align)
  • Craft knife or tiny scissors

Sponge or piece of foam (I used a shoe shine sponge – hotel freebie!!!!)
Paint (I used liquid acrylic but regular acrylic or screen printing ink would be fine, too)
Notebook (or any object you’d like to stencil)

 Making the stencil

  1. If you don’t have anything sticky to use for your stencil, you could use a piece of heavy paper, freezer paper or card stock & just tape it down. I like using something sticky because I like knowing my edges are sealed, just in case.
  2. Draw the image of your stencil on the frisket (or whatever you’re using). The negative space will be what gets painted so keep that in mind as you create. Start with something simple.
  3. Using your craft knife cut out the parts of the image that you want to appear in paint.

Stencil time!

  1. Position & stick your stencil on the notebook – lightly but enough so the edges of the stencil stay in place. If you created a stencil you need to tape down, use a couple small pieces of masking tape or painters tape to anchor it down. I left one of the bottom corners lifted up a little in the photo below to show you just how lightly I stuck my stencil down.
  2. Squirt/dab a little bit of paint on a scrap piece of paper. Dab the sponge in it and then tap it lightly a few times on the scrap paper to remove any globby bits.  Then dab your stencil with it (you want to lightly tap, overlapping each time, vs. rubbing). If you need to use a little bit more paint, go for it. It’s best to start light & add a little more (so the paint doesn’t bleed under your stencil).
  3. Remove your stencil & let the paint dry. Lifting the stencil is my favorite part!

I know I made these instructions a bit thorough! But don’t worry, this project honestly only took me less than 10 minutes to complete.

It’s a simple project for any maker level.

Happy making!

Make pizza night extra special | Make it!

5 May

My first day of outdoor Boot Camp yesterday morning and….PIZZA for DINNER! Sounds totally ridiculous, I know. But the best way to control what’s on your pizza is to make it yourself.

(SHHHH…don’t tell the kids…it’s also less expensive than ordering out!)

We’ve made our own crust in the past but opted for the next best thing last night — freshly made dough from our favorite local pizza shop. Truth be told, it’s much tastier than store bought dough…and cheaper. Most pizza shops only charge a dollar or so for a “dough ball”. We like our crust thin so 1 dough ball is plenty. Also, did you know the the “fresh” dough you buy in your local grocery store is often made, frozen & THEN put in the refrigerated section to thaw? Yuck!

Tips for handling dough

Make sure the dough is at room temp before you attempt to roll or toss it. Coat it with a little bit of flour or cornmeal (I like the crunch cornmeal adds after it’s baked) so it’s easy to form & doesn’t stick to your hands.

Patting it into a flat disk before rolling or tossing makes it easier to get an even shape. If tossing or stretching by hand (I prefer this method), use the tops of your hands/knuckles (vs. finger tips) and pull your hands outward, gently stretching the dough. This will help you avoid making any holes or tears.

Other tips

We loaded the pizza up with our favorite sauce and thinly sliced veggies (mushrooms, onions, red pepper & tomatoes). Tomatoes aren’t really tasty yet but Jess got 2 pints of cherry tomatoes on a crazy sale at the grocery store.  We roasted them in the oven before adding to them to the pizza (just toss a little bit of olive oil, salt & pepper with the tomatoes then spread them on a baking sheet & roast for about 15-20 minutes in a 400 degree oven). Roasting is a great trick for making tomatoes that aren’t in season super delicious.

Okay, consider the truth officially out. In high school (and summers in college), I worked at a pizza shop (affectionately knick named the “Pizza Shanty”) on Cape Cod, so I know a few secrets.

Cheese :: We generally use low fat cheese or regular cheese (just less of it). Jess recently bought some blocks of cheese that we’ve been shredding & slicing. It’s much more economical (thrifty!). I’ll admit, I’d gotten used to the convenience of buying shredded cheese but my parents always bought the blocks & shredded or sliced it. You could also buy local cheese at the farmer’s market or artisanal shop & make your pizza a little extra special! We like to use a variety of cheeses on our pizza. Last night: white cheddar & monterey jack.

Toppings :: Sauce & lightly cheese your dough then layer toppings, meat first, (if you’re just doing veggies, mushrooms count as “meat” so put those down first) then veggies. I like to put onions on last so they get a little caramelized. If you’re using fresh herbs layer them between toppings or sprinkle them on before adding any toppings so they don’t burn in the oven. Last step: sprinkle another light layer of cheese on top before tossing into the oven.

Cooking :: We had amazing pizza last summer that was cooked right on the grill. We don’t have a grill but we do have the next best thing…a pizza stone! It’s not just any pizza stone…please read on. We’ve had mixed results with pizza stones in the past. It’s one of those things that never seemed to work quite as promised and often ended up in the back of the cabinet & then for sale at our next yard sale. We’ve also tried cookie sheets, weird pizza pans with holes, etc. Our favorite tool by far is our Emile Henry Pizza Stone. It’s more versatile than your average pizza stone (it can be used on the grill & as a cook top for a variety of other items) and makes the crust super crispy. Preheating the oven is key! And whether you use a stone or cookie sheet, the trick is making sure you preheat it a bit before plopping the raw pizza dough on it. If you’re using a cookie sheet, brush it with a little oil before preheating. The oven temp should be about 425-450 degrees.

Cutting :: You don’t need any fancy cutting tools. A longer, sharp chef’s knife will do just fine. If you use a stone, you can cut the pizza right on it. If you use a cookie sheet, transfer pizza to a large wooden cutting board for easier cutting.

So…what are your favorite pizza toppings? Do you have any secret tips for making pizza at home?

Good things come to those who…share! | Thrifty trades

1 May

Remember that awesome partial roll of book binding leather I wrote about here that was taunting my making dreams?

Well, I need to be creative with how I use what I have left because I shared the good fortune (& the largest piece!) with my dad.  He’s a talented carpenter, wood turner & cabinet maker. “Projects” find their way into my dad’s garage, basement & workshop. Close friends of his have an antique business and they often drop off items that need to be fixed/restored. A recent addition, an adorable antique writing desk, needed a few small repairs and a new piece of desk blotter leather. As if it were meant to be, the largest piece of leather that I had nearly perfectly fit the designated spot.

You’d think I’d be a little sad, especially after coming across so many great scrap leather project ideas recently, but I love sharing a lucky find (thanks KH!) & I love trading. My dad’s friend is going to trade me something on my “thrift list” for the leather. Here are two things I have in mind.

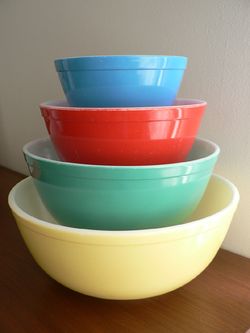
I have fond memories of making brownies & cakes with my gran in these & have been on the hunt for a complete set for years // source //:

I’m always on the look out for more Cathrineholm pieces to add to our collection // source //:

What’s at the top of your thrift list?

Oh and stay tuned…I need to take stock of the remaining scraps and decide which projects I’m going to make from last week’s post.