Tag Archives: breakfast

Got Bananas? | Two New Recipes That Are B-A-N-A-N-A-S!

1 Dec

We’ve gotten into this habit of buying bananas and forgetting about them until they are just on the brink of almost too ripe. Ugh. While I like them riper than I did in my childhood days, there’s a point where they are just to sweet for eating plain & are perfect for adding to oatmeal or topping a piece of toast with almond or peanut butter. This past summer, they couldn’t get overripe fast enough–I loved peeling, breaking them into quarters or thirds and tossing in a ziplock bag in the freezer for morning smoothies. YUM! But now I feel as though they stack up in the fridge, almost black, waiting for us to take the time to transform them into some delicious baked good.

I usually love going back to old favorites but I was in the mood for something new so I broke in Dorie Greenspan’s “Baking: From my home to yours” book that I got Jess for her birthday (oops!) and baked her Cocoa-Nana Bread–perfect for bringing into work. I also wanted something a little healthier that I knew we could safely keep around the house for us to enjoy. Enter iambaker‘s Chocolate Chip Banana Bars. Oh hi!

Needless to say, it was a perfect banana filled Sunday of baking.

First, the decadent-it’s-okay-to-eat-chocolate-for-breakfast recipe.

the lighting in our kitchen makes the bread look reddish but it was actually very very dark brown

the lighting in our kitchen makes the bread look reddish but it was actually very very dark brown

Cocoa-Nana Bread from Dorie Greenspan’s Baking: From my home to yours

Ingredients
2 cups all-purpose flour

1 cup unsweetened cocoa powder
1 1/2 teaspoons baking powder
1/2 teaspoon salt (we use sea salt)
1/4 teaspoon baking soda
1 stick unsalted butter, at room temperature
3/4 cup sugar (we use raw sugar)
1/2 cup (packed) light brown sugar
2 large eggs
2 ripe bananas, mashed
3/4 cup buttermilk (tip: if you don’t have buttermilk on hand, just add 1 tsp of vinegar to 1 cup of milk, stir & let sit for a few minutes)
1/2 cup store-bought chocolate chips

Steps
1. 
Center a rack in the oven & preheat the oven to 350 degrees (F). Butter a 9×5 inch loaf pan and place it on an insulated baking sheet–or on two regular baking sheets stacked one on top of the other. (This extra insulation will keep the bottom of the bread from over baking.)

Maker’s notes: And it did! This incredible tip transforms the way I’ll bake other quick breads from now on. There is nothing more frustrating than taking your labor of love out of the oven with either a raw center or burned outside just so the bread could bake all the way through. I used 2 baking sheets stacked & it worked perfectly.

2. Sift together the flour, cocoa, baking powder, salt & baking soda.

3. Working with a stand mixer fitted with a paddle attachment (I just used a hand mixer because I didn’t feel like dragging out the KitchenAid), in a large bowl, beat the butter at medium speed for about a minute until softened.

4. Add the sugars and beat for another 2 minutes. Add the eggs one at a time, beating for a minute after each addition. At this point, the batter may look a little curdled–it’s okay.

5. Reduce the mixer speed to low and mix in the mashed bananas.

6. Add the dry ingredients in 3 additions, mixing only until they disappear into the batter.

7. Still on low speed, add the buttermilk, mixing until it is incorporated.

8. Stir in the chocolate chips and scrape the batter into the pan.

9. Bake for 30 minutes. Cover the bread loosely with a foil tent to keep the top from getting too dark, and continue to bake for another 40-45 minutes (total baking time = between 70-75 minutes), or until a thin knife inserted into the center comes out clean.
Maker’s notes: Covering the bread with a foil tent is another really amazing tip that will change the way I bake future quick breads! The top came out perfectly and not overdone in the least bit.

10. Transfer the pan to a rack and cool for at least 20 minutes before running a knife around the edges of the bread and unmolding it. Invert and cool to room temperature right-side-up.

11. Store wrapped in plastic at room temperature and the bread will stay fresh for about 2 days. Tightly wrapped, it will keep up to 2 months in the freezer.

The verdict
Tasty! The loaf is really pretty–it baked nice & high with impressive cracks. The flavors were more developed the next day. It’s definitely chocolatey but you can still taste the banana. I’d love to try making a bread pudding with it because I think it would be super yummy dusted with powered sugar and topped with homemade whipped cream for dessert.

Next…the healthier sweet treat that would be a fun recipe for the kids to help make.

Chocolate Chip Banana Bars (Paleo) by iambaker

I followed iambaker’s recipe exactly so I’m not going to repost the recipe here but rather link to it here. Her photos are perfectly mouth watering! Check it out.

The verdict
I like her philosophy & skepticism (about Paleo “baking”) and was encouraged to try these due to the fact that she is a baker who typically uses all of the traditional  ingredients like flour, eggs, butter, etc. We liked these a lot. They were best right after baking–warm or at room temp–but I was hesitant to store them on the counter because they aren’t baked for very long & are quite dense/moist. So I cut them in the pan & stored them in the refrigerator. I let them come to room temp before enjoying (or warmed them in the toaster oven/microwave). When I make them again, I might use almond flour to add a little extra texture.

Making Breakfast Easy | Pumpkin Spice Oatmeal

23 Nov

Clearly I’m obsessed with pumpkin. I’ve fallen head over heels for the flavors of Fall. Last night my friend Dillan (Instagram handle: dillandigi) posted a photo of an overnight pumpkin oatmeal he was prepping for the morning. This was the inspiration for the recipe that I’m posting here today.

A few weeks ago, when Kate was traveling in Texas for work, I made myself pumpkin oatmeal in the slow cooker. It had good flavor, but it made a ton and the edges got kind of well done. So last night, I was looking online for overnight refrigerated oatmeal recipes, but decided that I might not like the texture, or that they might not be to my liking once heated up (since I didn’t want cold oatmeal this morning). Of course, typical me, I decided to wing a pumpkin oatmeal recipe this morning, inspired by this Choco-Banana-Chia Oatmeal recipe that Dillan posted on his blog in September (it’s especially tasty)!

pumpkinoats

Pumpkin Spice Oatmeal

makes 1 serving

Ingredients

1/2 c Trader Joe’s Gluten Free Rolled Oats
1 c boiling water
1 TBS 100% pure pumpkin puree (not pumpkin pie mix)
1/2 TBS chia seeds
1 tsp organic virgin coconut oil
2 tsp pure maple syrup
1/4 tsp pumpkin pie spice
1 pinch all natural sea salt (fine)
1 TBS organic dried cranberries

1) Add boiling water to the oatmeal and stir. I like my oatmeal a little on the thicker side, so I also microwave the oats and boiling water for 25 seconds, then stir.

2) Add pumpkin, chia seeds, coconut oil, pumpkin pie spice and stir.

3) Top with maple syrup, a pinch of salt and dried cranberries.

4) Enjoy!

Notes:
– Be sure to keep a close eye on your oatmeal in the microwave, if left unsupervised it can overflow & leave a mess.
– If you like your oatmeal unsweetened, omit the maple syrup–or for a less sweet option, reduce the syrup to 1 tsp.
– Feel free to use oats that are not gluten-free, the recipe would work just as well.
– Other delicious toppings would include: sprouted almonds, toasted pecans, or whipped cream.

Another great advantage of this recipe is that it is really healthy and costs almost nothing to make. All of the ingredients included in this recipe were items we had in our pantry–can’t get much better than that! 🙂

All About Fall | Gluten Free Buttermilk Pumpkin Spice Pancakes

19 Oct

My friend Potter, recently went for breakfast a the Neighborhood Restaurant. This is a local family owned breakfast joint located in Union Square, right down the street from Bloc 11 Cafe, where he and I both work. Potter and I share a love for all things pumpkin and he was going on and on about these pumpkin pancakes he had there, my mouth was watering just listening to him….

Bloc 11 courtyard

Bloc 11 Cafe courtyard: Scarecrows need coffee too!

Of course, this lead me to an inner baking challenge, something I set myself up for on the regular,ha! I was determined to come up with delicious gluten free and/or on the healthier side pumpkin pancakes. King Arthur Flour’s gluten free pancake mix was on sale at Shaw’s, so I used this as the base for my pancake recipe. In another effort to ensure a successful gluten free recipe I researched online, but had no luck. I even posted an outcry to my foodie friends on Facebook, which yielded no recipe results… my determination grew.
In true Jess fashion, as Kate would call it.. I just made my own recipe up, ad-libbed and hoped for the best. And as luck would have it, they came out perfectly! Success.

#yum

#yum

Guten Free Buttermilk Pumpkin Spice Pancakes

Makes 8 – 4″ round pancakes

Ingredients

1 1/3 cup King Arthur Flour gluten free pancake mix
1 cup organic or local whole milk (I used High Lawn Farm from Lee, MA)
1 tsp Bragg’s organic and raw cider vinegar
1 large organic egg
3 TBS 100% pure canned pumpkin (not pumpkin pie mix)
1/2 TBS organic virgin coconut oil (melted)
1/2 tsp pumpkin pie spice

1) Measure out the milk and add the cider vinegar to it, making your own buttermilk. Let sit for 3 – 5 minutes.

2) Whisk together the egg, pumpkin, buttermilk mixture, and coconut oil.

3) Whisk in the pancake mix and pumpkin pie spice.

4) Allow the batter to sit for 10 minutes to thicken.

5) Preheat a griddle or large flat grill pan. I used our gas stove and set the burner on 6.

6) Grease pan with a square of organic butter.

7) Scoop the batter by the 1/4 cupful or I used a #16 dough/portion scoop onto the lightly greased pan.

8) Cook for 1 – 2 minutes, until bubbles form on the tops of the pancakes and the bottoms are golden brown.

9) Flip and cook for 1 – 2 minutes on the other side. Serve hot, with organic butter and organic warm pure maple syrup.

These pancakes came out amazing, and you can’t even tell they are gluten free! There is a slight pumpkin undertone with just the right amount of spice to add to the flavor, but not mask the pumpkin. I would make these again in a heartbeat. The recipe made 8 full sized pancakes and a tiny silver dollar sized pancake, the perfect size to split between Stevie and Ollie and they gobbled it right up 🙂

Notes:
– This recipe could be made dairy free by substituting the milk for coconut, soy, or almond milk and replacing the butter with Earth Balance
– A great side, as pictured above is Applegate Farms Organic Sunday Bacon. (I cooked it in the oven on 400 for 15-18 mins on a parchment lined baking sheet*) *Oven baked bacon credit goes to our friends Laurie & Gabe 🙂
– Substitution suggestions for toppings: Maple Cream, Pumpkin Butter, or Baked Spiced Apples.

Cutest Pumpkins Ever!

Cutest Pumpkins Ever!

Happy Fall!

Oven Roasted Tomatoes | Versatile & Easy!

28 Apr
tomatoes, olive oil and S&P waiting to be roasted

tomatoes, olive oil and S&P waiting to be roasted

The warmer New England weather is starting to remind me of the summer foods I’ve missed all winter. Top of my list? Fresh tomatoes!

Grocery stores have been taunting me with tomato sales but I know they’re not yet in season. There is nothing quite like a just-picked tomato at the height of its season (or any produce, for that matter). My dad grew them nearly every summer in the garden when we were kids. He’d have competitions with a fellow gardner friend and I have vivid memories of secret tricks and strange apparatuses surrounding the tomato plants in the garden. My mom would make tomato and cheese sandwiches for us to enjoy at the peak of tomato season — hearty white bread spread with Miracle Whip then stacked with layers of sliced tomatoes and cheddar cheese & a little sprinkle of S&P. Yum…summer in sandwich!

So back to my point….since cherry tomatoes have been on sale quite a bit, Jess has been buying them. They were fine tossed into my lunch salads but I wanted a way to make them more delicious. Flour Bakery (a Boston area delight) is smart — and their BLT is the best BLT I’ve ever had in my life. I dream about it.  One of their secrets? They roast the tomatoes when they’re not in season in order to bring out their yumminess. Roasting also rids them of that gross mealy texture that often plagues out-of-season tomatoes. The recipe I used as a guide states, “roasting concentrates their flavor, turning the tomatoes into savory, tender little umami bombs”. Genius, right? It’s very easy & roasted tomatoes are a perfect addition to any recipe, sandwich, salad, pizza, pasta/rice salad, etc. — the possibilities are endless. We added them to a homemade pizza with oven roasted rosemary lemon turkey breast and banana pepper rings.

fresh_to_roasted

top: before roasting, middle: after first 20 minutes, last: after roasting

Oven Roasted Tomatoes (adapted from America’s Test Kitchen: DIY Cookbook, Oven Dried Tomatoes)

Ingredients

12 ounces – 1 pint of cherry tomatoes (grape tomatoes would work fine, too)
1 Tablespoon olive oil
salt and freshly ground pepper to taste

Steps

  1. Preheat the oven to 425 degrees.
  2. Rinse the tomatoes and lightly pat dry with a clean dish towel.
  3. Cut each tomato in 1/2 lengthwise & toss into a small bowl (with enough room for tossing later).
  4. Add olive oil, salt & pepper to the bowl and toss to evenly coat the tomatoes.
  5. Line a rimmed baking sheet with parchment paper (or aluminum foil) for easy clean-up. Place a wire rack on top of the prepared baking sheet and lightly spray with non-stick cooking spray.
  6. Place the seasoned tomatoes on the rack cut side down (not all of mine were facing down & they turned out fine).
  7. Place tomatoes into the oven for  20 minutes.
  8. Carefully remove the baking sheet from the oven and immediately turn the temperature down to 300 degrees.
  9. Use a fork to carefully flip the tomato halves cut side up and remove any tomato skin that has fallen off. If all of your tomatoes still have the skin on them, there’s no need to remove it since cherry tomatoes have such tender skin.
  10. Place them back in the oven for 20-25 minutes.
  11. Remove from the oven & allow to cool to room temperature before enjoying.

Store in an airtight container in the fridge for up to a week.

roasted tomatoes standing by to be the next pizza topping

roasted tomatoes standing by to be the next pizza topping

Make My Morning | Easy Dairy Free Baked Oatmeal

13 Jan

baked oatmeal

My first post of 2013, making changes and organization continues… are you sensing a theme from our tiny household? Last Fall I got into making a large baked oatmeal recipe that Kate and I would take pieces of for breakfast to have at work during the week. It was addictive and I made it several times, each time mixing it up a bit and changing the fruit I added to it. I even got Kate’s dad, Denny, into making it and eating it!

Needless to say, after a while I got sick of baked oatmeal every morning, and I stopped making it. That was last year and with the new year, Kate asked me to start making it again in order to get back into healthier habits 🙂 Below is the recipe I created for 2013 and even made dairy free and gluten-free! The best part about this recipe is that it can all be made in one bowl, easy to put together and even easier clean up.

Dairy Free/Gluten-Free Baked Oatmeal

Ingredients
2 eggs
1 c soy milk (I used vanilla that is what we had on hand)
1/3 c maple syrup
1/2 c apple sauce
1 tsp cinnamon
1/3 c walnuts (chopped)
1/3 c shredded coconut
2 c frozen berries (I used blueberries and blackberries)
1/3 c dried cranberries
2 c rolled oats (I used gluten-free rolled oats from Trader Joe’s)
1/2 tsp salt
1 tsp baking powder

Steps
1) Preheat oven to 375 degrees

2) Spray a 9 or 10 inch pie plate with nonstick spray

3) In a large bowl whisk together all of the wet ingredients

4) Add the remaining ingredients to the wet mixture and stir with a wooden spoon or spatula

5) Pour mixture into your prepared pie plate

6) Bake for 40 – 45 minutes until golden brown

Notes:
1) Kate loved this recipe, but I found that it was too dry for my liking.
2) Denny loves his baked oatmeal more moist, he usually adds double the amount of milk to the recipe, I’m sure this would work with this recipe too.
3) Try topping this recipe it with 2 TBS of melted Earth Balance non dairy spread right when you take it out of the oven.
4) Serving suggestions: top with maple syrup, or Chobani Greek yogurt (if you like dairy), or pour some warm soy milk on top.

Happy and healthy 2013!

We Made It! | And…What the Heck is a Dutch Baby?!

30 Dec

YAY, it’s almost 2013! Which means, we’ve made it through the holiday season unscathed. I know…so dramatic. But in addition to the goodies & gifts we like to make around the holidays (granola, candy cane bark, sweet cards & gift tags, DIY all purpose cleaner (more about that in a future post!), broccoli shallot quiche, avocado coffee cake, the list goes on and on…) my Etsy shop, Opal & Ollie was bursting at the seams with holiday orders (I had over 100 Etsy orders in 1 month — not including the 2 local shops I had to keep stocked up!). So I feel like it’s totally acceptable to breathe a deep sigh of relief and reset after a few days off. Now on to organizing, cleaning & putting away our abundance of Christmas gifts (wheeeee!).

This morning, when Jess started flipping through cookbooks BEFORE we’d even had our morning coffee, I knew something was up. In typical Jess fashion, she was looking for the perfect compliment for a jar of Nutting Farm maple butter that I’d tucked in her stocking (from our excursion to Eat Boutique — which was amazing, by the way — where Jess met on of her fav bloggers in all the whole world, Joy the Baker). That perfect compliment came in the form of a dutch baby. What the H is a dutch baby, you ask?! Read on…

photo-8

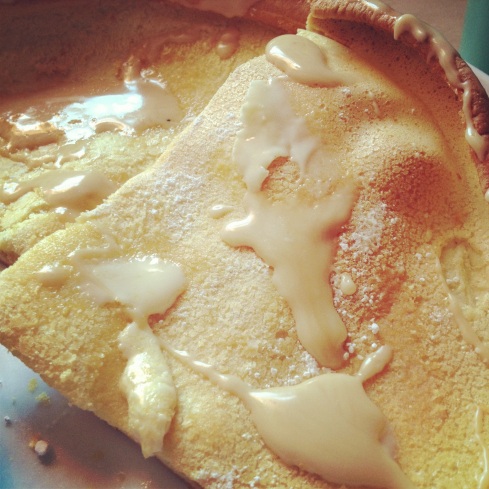
We were first introduced to dutch babies at a small historic inn in rural Vermont where we spent the weekend attending the wedding festivities of our friends Lindsay and Jonathan. The inn keepers cooked meals for the guests so we headed to the dining room for breakfast one morning. Plates were placed in front of us with an odd looking berry-muffin-popover-like thing in the middle. This particular dutch baby was not my jam (you could tell it had been pre-made & heated) but none-the-less I was intrigued. So fast forward to this morning when Jess stumbled upon the Smitten Kitchen dutch baby recipe below. It’s a delicious breakfast treat that’s like a popover and a crepe/pancake had a baby (maybe that’s where the name comes from?!). They weren’t too sweet — just right topped with a dusting of powdered sugar & some maple butter (or in my case, maple syrup). Dutch babies are also called “german pancakes”. Somehow this makes more sense to me now.

Pros: It’s lighter than a pancake. It doesn’t require the baby sitting/tending that pancakes require — since you bake it in the oven. So I was able to enjoy coffee with Jess instead of stressing about when to flip the pancakes & then how to keep the first batch warm as the other batch cooked in the skillet. It’s also really delicious and paired perfectly with maple goodness and soy sausage patties.

Cons: Ours cooked a little too much on one side so one edge was a little dry — but nothing that a little extra maple butter or syrup couldn’t fix!

Recipe notes: We only had 3 eggs in the house so we made 1/2 the recipe. It worked out great. The tablespoons of butter that the recipe calls for is definitely for the batter (and doesn’t include what you use to grease the cake pan) — we thought that was a little confusing. You could totally make these in muffin tins for cute-sized individual portions.

mapledutch

Recipe credit: Smitten Kitchen

Dutch Babies/German Pancakes

Yield 2 9-inch pancakes.

4 eggs
1 tablespoon sugar
1/2 teaspoon salt
2/3 cup flour, sifted
2/3 cup milk
2 tablespoons soft butter

Heat oven to 400°F. Butter two 9-inch cake pans well. Put eggs in blender container, cover and process at until light yellow in color. Remove cover and add remaining ingredients; process until smooth. Pour into prepared pans and bake 20 minutes; then reduce heat to 350°F and bake 10 minutes. Slide onto hot plates. Serve with lemon slices, powdered sugar and butter if you follow recipes to the letter, maple syrup if you’re me and maple butter if you’re Jess. It would be really yummy with fresh berries too.

Happy baby making! (Ha…) And happy almost 2013!

Falling for Fall | Pumpkin Buttermilk Pancakes

30 Oct

Oh how we love this time of year when pumpkin makes an appearance in every corner of our lives from our oven to our pups’ dinner bowls. Pumpkin baked goods, pumpkin brewed craft beer, savory pumpkin dishes, pumpkin carving, roasted pumpkin seeds…and the list goes on…

We had some leftover buttermilk (from the best yellow cake recipe I’ve ever made….a future post, so stay tuned!) that screamed “Oh hi, PANCAKE opportunity!” to me as I headed into the refrigerator to get fixings for my weekend coffee.

So I made these amazing pancakes from Heather Cristo’s blog. Um, who can resist a recipe that has the word “best” in it? Clearly not me!

Verdict: They were really yummy! I’ve included some notes about the recipe, etc. below. 

Maker’s notes

Recipe | I added a 1/4 tsp of pumpkin pie spice to the batter (because we had it on hand).  I was hesitant to add more because I didn’t it to overwhelm the yummy pumpkiny goodness. It added a subtle spice & depth of flavor. Add more if you want to really taste it. I love a salty pancake and don’t usually add much (if any) sugar to things that I’m going to drizzle with maple syrup. That said, these were a little too salty. If I made these again, I’d cut back on the salt (to 1/2 tsp) and add a tablespoon of sugar (raw, white, brown, light brown…whatever we happened to have in the pantry).

These would be really easy to make vegan by making your own “buttermilk” (using soy milk adding lemon juice or vinegar) and adding a butter substitute for the butter.

Cooking | I cooked all of them before we sat down to eat, keeping them warm on a low temp in the oven on a cookie sheet lined with parchment.

Leftovers | I wrapped up the leftover pancakes and tossed them in the refrigerator.  We heated a couple of them in the toaster (Jess’s brilliance!) the next day & had them with a cup of tea as we stayed safe inside while hurricane Sandy danced with the power lines outside our house.

If you have pups, here’s a great use for the leftover pumpkin! Mix a tablespoon of pumpkin in with their food. They’ll love it and it’s great for their digestive health — it magically helps with diarrhea or constipation. Just make sure it’s the same kind of pumpkin you’ll have leftover from this recipe — canned plain pumpkin (not the pumpkin pie filling kind with added sugar & spices).

Happy making! Happy Fall!

Making & Baking Our Way into Fall | Pics & Links

3 Sep

Oh hi! Here’s what we’ve been up to (a meaty post with pictures & links!)…

Savoring summer, time with Kate’s dad & the best lobstah roll ever (PJ’s Family Restaurant in Wellfleet).

Making pickles! Refrigerator style using this recipe and farm fresh pickling cukes from a farm near Jess’s home town. We added cloves of garlic & black whole peppercorns to each jar. We also made a spicy batch for our neighbor by tossing in a sliced jalapeno from our container garden (YAY!). We’ve been eating them on EVERYTHING (pictured below on turkey sandwiches).

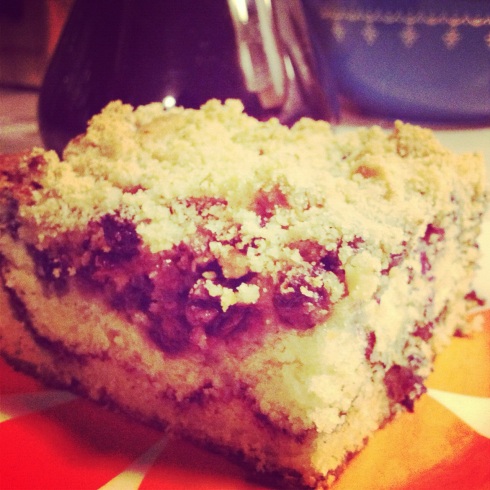
Salivating over a new issue of Bon Appetit and celebrating awesome neighbors with this delightful coffee cake. Toss blueberries in panko breadcrumbs? SURE!

Here’s what the blueberry coffee cake looked like sliced (just before it got hand delivered to our favorite neighbors). This Instagram filter makes it look straight out of my mom’s 1970 Better Homes & Gardens cookbook.

Catching up on crafty gifts, part I! Long overdue wedding card/art piece for friends Emily & Chris. Those are heart shaped bits I cut out of their save-the-date & invitations. I love sewing paper.

Catching up on crafty gifts, part II! Finally getting around to finishing this advent calendar project for 2 very special little boys (yes, that’s 48 little fabric bags). Promised last year that I’d make these & we’d fill them with goodies each year…literally the gift that keeps on giving! The first time I stumbled across this project on Lansdowne Life, I obsessed over the adorable vintage looking fabric…to die for, right?!? Can’t wait to fill the bags with goodies & send them off. Oh & those pinking shears were an amazing vintage find at a little consignment shop on the Cape. 

Officially launching Opal & Ollie on Etsy. YAY! A selection of my etched glass mason jars are also available at Magpie in Davis Square & On Centre in Jamaica Plain.

Summer of Love | Picnic Recipes Galore

25 Jul

Summer is for harvesting garden goodies, hanging out outside — picnics, hammocks, BBQs & early morning outdoor bootcamp — cold brewed coffee, fizzy fruity delights, cooking with farm/our container garden fresh ingredients, crafty endeavors, new friends & romps with the pups. Phew…all that and we’re back in BlogLand with a vengeance!

We celebrated our first anniversary (and 7th year of togetherness!) over the weekend & it was filled with commissioned art (thanks to Nan Lawson, Flowers In May & the fact that paper is a traditional first anniversary gift), yummy food & sentimental goodness (Remember when I wanted a set of these ? Well, Jess surprised me with a vintage 1940’s set in mint condition. *swoon*).

custom illustration by Nan Lawson

custom anniversary illustration by Flowers in May

I had ambitious plans to surprise Jess with a romantic outdoor picnic — filled with smartly designed paper goods, mason jars upon mason jars, yummy food reminiscent of our wedding catering — spread on a handmade little blanket/quilt made out of fabric from our wedding. But I participated in ArtBeat as a craft vendor on Saturday & totally ran out of time (despite planning the picnic menu & starting projects months ahead of time).

my table at ArtBeat! Opal & Ollie Etsy shop opening in August! stay tuned…

So…the weather forecast wasn’t promising & I decided, the morning of, that we’d either eat inside or on the deck. Oh, and, I didn’t finish the blanket but I made really great progress & will finish it one night this weekend. We used an adorable picnic blanket as a tablecloth that our friends Cobi & Sarah gave us as a wedding shower gift. K.I.S.S., right?

Now on to the good stuff!

The menu (with links to recipes & my notes)…

Deviled eggs | Recipe: Mark Bittman (basically your traditional deviled egg recipe: hard boiled eggs, dijon mustard, mayo, S&P) | I topped each with a tiny bit of dill relish instead of paprika.

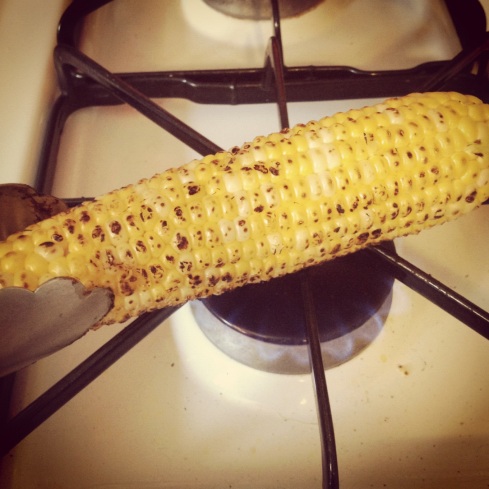
BLT corn salad lettuce wraps | Recipe: Joy the Baker | This charred corn salad was incredible. I used high quality bacon & oven roasted it. Charring corn in a small apartment kitchen over an open gas burner flame is amazingly fulfilling! I wondered if the corn would actually cook & it did…perfectly! It turned a darker yellow as the kernels crackled & blackened. Mess warning: the stovetop was eat-off-of-it clean before this endeavor & corn shrapnel was everywhere after 3 ears of corn were nicely charred. Well worth it though!

Best berry salad | Recipe: Our very own!

Chocolate yogurt snack cakes | Recipe: Smitten Kitchen | Ah-mazing! I added a teaspoon of espresso powder to the recipe to bring out the depth of chocolatey goodness & dusted the cooled cakes with a little bit of powdered sugar. I’d make them again in a heartbeat. Oh, I had trouble finding whole milk yogurt (weird because I remember seeing it years ago – before the shelves were overflowing with a million brands of Greek style yogurt) so I opted for 2% Swiss yogurt.

Coconut rice pudding with fresh mango | Recipe: Mark Bittman (traditional rice pudding from How to Cook Everything, see very bottom of this post for recipe) | I substituted light canned coconut milk for the cow’s milk. I also added a teaspoon of vanilla extract after the pudding finished cooking. I served it cold with diced fresh mango to mimic the flavors of Jess’s favorite mango sticky rice dessert from a local Thai restaurant.

Home-brewed Arnold Palmers | Recipe: Tyler Florence | The slushy & bright homemade lemonade makes this drink extra special. Definitely prepare this a few hours ahead of time as all of the components need to be nice & cold. Served up in a mason jar with tiny heart etched in the glass (by yours truly!).

mis en place: chocolate yogurt snack cakes

roasting corn!

the spread!

Arnold Palmer with a twist

Rice Pudding (Mark Bittman, How to Cook Everything)

Ingredients:
2 cups water

1 cup long or short-grain rice (I used arborio)
dash salt
2 cups milk (I used canned light coconut milk)
3/4 cup sugar, or more to taste (3/4 cup was plenty for our taste)
1 teaspoon ground cinnamon or cardamom (I skipped the spices because I knew I wanted to top with mango)
1 teaspoon vanilla extract

Steps:
1. Bring the water to a boil in a medium saucepan; stir in the rice and the salt. Cover & cook over low heat until almost all of the water is absorbed, about 20 minutes.

2. Uncover, pour in the milk, and cook, stirring frequently, until about 1/2 the milk is absorbed. Stir in the sugar and spices and continue to cook until the rice is very soft and the milk absorbed. About halfway through the cooking, taste and add more sugar if necessary. 
3. Spoon into custard cups and serve warm or cold, garnished with whipped cream. I served it topped with diced fresh mango. 

This keeps well for 2 days, or more, covered and refrigerated. Serves 8.

Berries All Around! | Best Berry Salad

23 Jun

image credit: my mom’s childhood “Fun to Cook Book” printed by the Carnation Milk Company

Jess first made me this yummy treat as part of a little picnic (@ Walden Pond!) we went on when we first started dating. Berries are in season & they’re everywhere! Take advantage of local “pick your own” farms — or the sales in your local supermarket & bring this along to your next BBQ. It’s really easy to whip up & your friends/family will thank you! Extra bonus: it’s healthy too. 

Best Berry Salad

Ingredients

2 quarts of strawberries
2 pints of blueberries
1 pint of raspberries 
1/2 pint of blackberries
1/2 cup “Craisins”
1/2 cup walnuts, roughly chopped 
2 Tbsp cane sugar or other natural sweetener

Steps

1. Rinse the berries in cool water & drain.
2. Hull & quarter the strawberries.
3. Put the berries, Craisins, walnuts & sweetener into a large bowl & gently toss with a wooden spoon.
4. Let the salad rest at room temperature for 15 minutes or so to let the fruit macerate.  
5. Serve immediately or cover & refrigerate. 

Happy picnicking!